Anna's Multi-Texure Mapping Technique Tutorial for PolyWorks
This tutorial assumes some previous experience with PolyWorks.
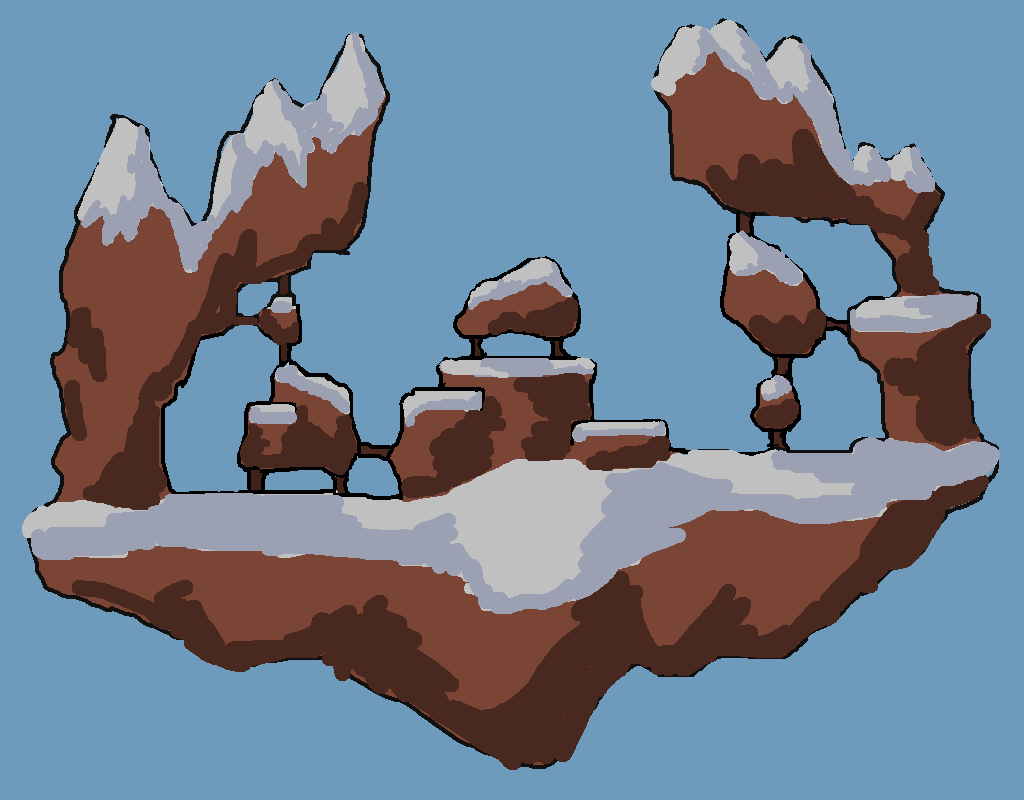
It is based on this map.
Design Your Map
You should have some idea of what you want your map to look like before you start. I recommend having a simple sketch to work from.
[IMAGE]
Preparing the Texture
I chose two default textures for this map, ananas.bmp (snow) and pistacja.bmp (rock). Photoshop was used to create two smooth vertical transitions between the textures. I arranged the two textures and the two transitions so that the resulting 128x512 bitmap would tile seamlessly. It's not necessary for the texture to tile but it makes things a little easier later on.
[IMAGE]
One thing to keep in mind is that textures are automatically scaled up to the nearest power of two, so it's best to use bitmaps with dimensions that are powers of two so that the texture doesn't appear stretched.
Building Blocks and Shaping
In PolyWorks I load the texture and change the background colours to something more appealing.
[IMAGE]
Then in the Properties window I set the texture dimensions to the dimensions of the texture.
[IMAGE]
I start making the map by creating some 128x128 blocks to determine the offset of the texture.
This is easy when using the grid at default settings (spacing = 32, divisions = 4).
[IMAGE]
These are the basic building blocks of the map. With these polys and the duplicate function I start putting things together.
[IMAGE]
To make the map more detailed it's necessary to create more complex arrangements. The split function is useful at this stage.
[IMAGE]
[IMAGE]
I continue to add more to the map and begin to give it a more interesting shape, using the split function wherever needed.
[IMAGE]
Colour and Shading
For my palette I chose to use 4 shades of blue for snow and 4 shades of brown for the rock. For the transition I just blended the blue and brown together to get 4 shades of a colour halfway between the other two.
[IMAGE]
I decided that most of the light was coming from the left side of the map and applied colours accordingly.
[IMAGE]
One thing to remember is that lighter areas often appear closer to the viewer. This is an easy way to add depth to your map, but it shouldn't be overused.
[IMAGE]
[IMAGE]
[IMAGE]
[IMAGE]
[IMAGE]
Finishing Touches
[IMAGE]
When choosing background colours I find that using colours similar to the ones in the map works well. After the poly placement was mostly done I added some scenery and colliders. Finally I tested it for poly bugs and fixed the ones I found.
One problem I had with this map was that the poly count was quite high for the size. In Soldat, high poly count maps cause the frame rate to drop because of edge rendering. To counter this problem I didn't include an edges file. However this causes some problems for people who download the map by joining a server. (It's also possible to turn off edges.)
[EDIT]
I forgot to mention that fixed texture should be turned OFF for this method.
Also, you can make something like this to help determine if your texture is aligned correctly:
[IMAGE]
[/EDIT]
Conclusion
This is just one basic method for creating multi-texture maps. With more experience and experimentation it could be refined to be more practical and efficient. I hope that after reading this tutorial you've gained some new and useful knowledge. Happy mapping ;]
Credits
Thanks go to all the mappers in the Soldat community; I learned a lot from looking at existing maps.
Thanks also to everyone who helped to test my map and gave me suggestions, especially cooz <3
This tutorial assumes some previous experience with PolyWorks.
It is based on this map.
Design Your Map
You should have some idea of what you want your map to look like before you start. I recommend having a simple sketch to work from.
[IMAGE]
![[IMAGE]](http://img.photobucket.com/albums/v251/Anna_Z/drifts_whiteboard_x.png)
Preparing the Texture
I chose two default textures for this map, ananas.bmp (snow) and pistacja.bmp (rock). Photoshop was used to create two smooth vertical transitions between the textures. I arranged the two textures and the two transitions so that the resulting 128x512 bitmap would tile seamlessly. It's not necessary for the texture to tile but it makes things a little easier later on.
[IMAGE]
![[IMAGE]](http://img.photobucket.com/albums/v251/Anna_Z/ananaspistacja.png)
One thing to keep in mind is that textures are automatically scaled up to the nearest power of two, so it's best to use bitmaps with dimensions that are powers of two so that the texture doesn't appear stretched.
Building Blocks and Shaping
In PolyWorks I load the texture and change the background colours to something more appealing.
[IMAGE]
![[IMAGE]](http://img.photobucket.com/albums/v251/Anna_Z/mapsettings.png)
Then in the Properties window I set the texture dimensions to the dimensions of the texture.
[IMAGE]
![[IMAGE]](http://img.photobucket.com/albums/v251/Anna_Z/properties.png)
I start making the map by creating some 128x128 blocks to determine the offset of the texture.
This is easy when using the grid at default settings (spacing = 32, divisions = 4).
[IMAGE]
![[IMAGE]](http://img.photobucket.com/albums/v251/Anna_Z/blocks.png)
These are the basic building blocks of the map. With these polys and the duplicate function I start putting things together.
[IMAGE]
![[IMAGE]](http://img.photobucket.com/albums/v251/Anna_Z/buildup.png)
To make the map more detailed it's necessary to create more complex arrangements. The split function is useful at this stage.
[IMAGE]
![[IMAGE]](http://img.photobucket.com/albums/v251/Anna_Z/complex02.png)
[IMAGE]
![[IMAGE]](http://img.photobucket.com/albums/v251/Anna_Z/complex01.png)
I continue to add more to the map and begin to give it a more interesting shape, using the split function wherever needed.
[IMAGE]
![[IMAGE]](http://img.photobucket.com/albums/v251/Anna_Z/interesting.png)
Colour and Shading
For my palette I chose to use 4 shades of blue for snow and 4 shades of brown for the rock. For the transition I just blended the blue and brown together to get 4 shades of a colour halfway between the other two.
[IMAGE]
![[IMAGE]](http://img.photobucket.com/albums/v251/Anna_Z/palette.png)
I decided that most of the light was coming from the left side of the map and applied colours accordingly.
[IMAGE]
![[IMAGE]](http://img.photobucket.com/albums/v251/Anna_Z/colour.png)
One thing to remember is that lighter areas often appear closer to the viewer. This is an easy way to add depth to your map, but it shouldn't be overused.
[IMAGE]
![[IMAGE]](http://img.photobucket.com/albums/v251/Anna_Z/progression01.png)
[IMAGE]
![[IMAGE]](http://img.photobucket.com/albums/v251/Anna_Z/progression02.png)
[IMAGE]
![[IMAGE]](http://img.photobucket.com/albums/v251/Anna_Z/progression03.png)
[IMAGE]
![[IMAGE]](http://img.photobucket.com/albums/v251/Anna_Z/progression04.png)
[IMAGE]
![[IMAGE]](http://img.photobucket.com/albums/v251/Anna_Z/progression05.png)
Finishing Touches
[IMAGE]
![[IMAGE]](http://img.photobucket.com/albums/v251/Anna_Z/eskimo_overview.jpg)
When choosing background colours I find that using colours similar to the ones in the map works well. After the poly placement was mostly done I added some scenery and colliders. Finally I tested it for poly bugs and fixed the ones I found.
One problem I had with this map was that the poly count was quite high for the size. In Soldat, high poly count maps cause the frame rate to drop because of edge rendering. To counter this problem I didn't include an edges file. However this causes some problems for people who download the map by joining a server. (It's also possible to turn off edges.)
[EDIT]
I forgot to mention that fixed texture should be turned OFF for this method.
Also, you can make something like this to help determine if your texture is aligned correctly:
[IMAGE]
![[IMAGE]](http://img.photobucket.com/albums/v251/Anna_Z/ananaspistacja_clr.png)
[/EDIT]
Conclusion
This is just one basic method for creating multi-texture maps. With more experience and experimentation it could be refined to be more practical and efficient. I hope that after reading this tutorial you've gained some new and useful knowledge. Happy mapping ;]
Credits
Thanks go to all the mappers in the Soldat community; I learned a lot from looking at existing maps.
Thanks also to everyone who helped to test my map and gave me suggestions, especially cooz <3